Wednesday, September 9, 2009
Another small Detail
Close up of small buildings closer to the rocks. The challenges here are that these buildings are directly below where I was standing when I took the reference photo. I got a strong sense of vertigo and wanted to convey this felling. Anyway this is the closeup and I made the buildings sharper than in the background as they are closer. Hope this works.
Day I don't know lost count
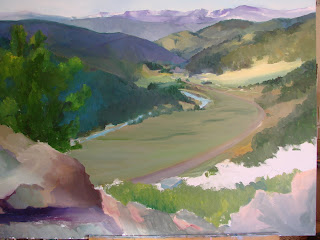
This is a close up of the distant pass toward the Moffat Tunnel. I do not want to make anything very specific as it is so far away and needs to remain soft to convey the distance. Since this painting is very large 48" x 36" there are afew smaller painting contained within. At this point it is very slow going. A lot of looking and not much painting.
Sunday, August 23, 2009
Day 7 Sunday
Just went to the garage to eat lunch and start refining the far valley. Had to move one of the grey outcroppings farther to the left. This opened up the valley a bit and allows me to bet some indication of the valley that is bright green just beyond. Next painting sessions there will not be any dramatic difference just working on the details that in the end will make the painting whole.
Day 6 Finally got the canvas covered
Well I finally got the canvas covered. It has been a long hard struggle to get the little buildings on the right side placed where they should be, but they are relatively acurate at least for now. Next session I wil start to
refine the painting starting at the far end of the railroad track.
Friday, August 21, 2009
Day 5 Painting Rocks
Painted about 4 or 5 hours just on the rocks on in the foreground and some on the left side. As you can see the white space is getting smaller and smaller. There are several houses and things in this space and they are directly under where I am standing, so the perspective is very unusual. Next time I work it will be to finally get the canvas covered. In all the years that I have painted, we always said that we did not have a painting until the canvas was totally covered with paint, no matter what stage that was. I really can't judge too many things at this point, but I still am adjusting to what I have and hopefully something will be right.
My daughter thinks I have a ways to go on the rocks on the left, as they look like icing to her on the "CAKE BOSS" one of her favorite programs. Guess I still have a ways to go.
Day 4 where I left off yesterday
This is where I left off yesterday. Forgot my camera, so took a picture this morning before I started. I am laying in the rocks and the tree. Things seem to be in approximately the right place. No more moving mountains, which was not easy. The foreground rocks will be a fairly large problem. Getting the paint to do what I want will not be easy for me. I had originally thought that I might do the rocks using an acrylic technique that I have perfected, but decided to be pure and continue in with the waterbased oils. So let's see what happens. I suppose I can always go back and do them in acrylic.
Thursday, August 20, 2009
Day 3 and 4
After another couple of days of painting, this is where I decide to leave it for a time. Things still seem to be coming into place. My intention is to get everything in the right place and the right value. I am working on just the large shapes at this time and will leave the details for later The oils are still working well. I went out yesterday to do Plein Air in Eldora at another friend's garden. Will post the painting tomorrow.
So I am getting caught up a little and it is a good feeling.
Day 2 of Continental Divide
I forgot to mention that I will be painting this in water based oils. I sent to ASW for a new brand from
Weber and I really have had good luck so far. They are very intense and so far the darks do not sink in
and remain vibrant.
This is the end of day two of painting. I was able to get the far range of the Continental Divide pretty much the value and drawing that I wanted. They are at least 10 miles away and some with the snow are probably up around 13,000 feet or more. I am viewing this from 9000 ft.
The valley below is the train that goes to the Moffat Tunnel to get to the Western Slope. My friend lives on the Eastern Slope in Rollinsville, Co and I am now in Nederland, Co for a portion of the year. The warm portion of the year.
In day two I was able to get to the next range of mountains, still very far away. The patterns made by the clouds on the land makes the scene change in sections. I do not think that it is ever the same when you look out from her kitchen and dinning area.
The Continental Divide from Nan's House
This is the first picture that I took of the beginning of a new painting. It is very large, will let you know the exact size tomorrow. I was so enthusiastic about this view that I saw from my friends house in Rollinsville, Colorado, that I could not wait to start painting it in the studio. I took several photos and then chose a large canvas, as the view is so overwhelming that it needed a large canvas. I laid it out in charcoal directly on the canvas. Usually I do some sketches first, but this time, I really knew what I wanted and went right for it.
In order to key various points on the canvas, as I kept getting lost, I marked them in various colors of pastel. You can see some of these still on the right side. Part of the problem of such a large canvas, with such a large view that you do get lost and forget where you are.
Thursday, June 12, 2008
THE WHITE PETUNIA
While I was building the flowers, I tried to replicate all the texture that I saw closeup in the flower, both in real life and in the enlarged photo.
My working process for these large flowers is to digitally photograph the flower and then working with it in the crop mode of Picasa, I design the composition of the actual flowers I have photographed. My camera is 8 mp, so the photos are still quite detailed when they are blown up. Once a composition comes to life for me I print it out 8.5"X11.
I then free hand draw the composition on the canvas with either charcoal or pencil, depending on the amount of detail that I want in the original drawing.
The next step is to start building the flowers. I usually use more molding paste on the lighter colors of the flowers. I keep the molding paste white at this point. This process takes several days due to the drying time. I am experimenting in the darker flowers of mixing the values that I want from the beginning. Then glazing over that to gain more depth.
So far I really enjoy this type of painting in a studio environment. This spring and fall I have been painting Plein Air for the most part and using a less structured technique.
Monday, March 24, 2008
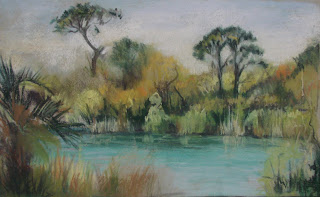
Pastel Oscar Scherer State Park, Fl.
 I have been taking a course with Sally Christiansen from the Venice Art Center this spring for pastel plein aire painting. This is the first pastel that I have done in 40 years. I have to say that I am very please. I dragged out this great set of pastels that I had been given in the 60's when I was doing figure studies in pastels. The pastels still worked and I was excited using them.
I had originally thought that I would take the class just to have a group to paint outside with and inspire myself to do it. There is something about paying money for a class that motivates you to show up, rather than just trying to do it on your own. I painted in the fall class and enjoyed it. The other students in the class encouraged me to do a pastel to get the most out of the class and the instructor who is very good. So here it is and I must say that I am pleased.
I will be going about tomorrow to do the next one, so hopefully this was not just beginners luck so to speak. Wish me luck.
Final picture of the Mountain Brook
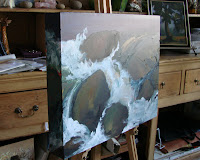
 I finally have been able to post the final rendition of the Mountain Brook. It was a very interesting painting to paint, and trying to get the wet look of the rocks and the rocks under the water at the top right of the painting. I used a lot of glazing techniques to obtain the look that I wanted and am very excited about painting some other brook scenes when I go back to Colorado this summer. There are so much inspiration and peace painting at a mountain brooks, I look forward to more.
Hope everyone enjoyed the exercies and I am sorry it that it took so long to post the final results. Hopefully the next time I will be more diligent.
Sunday, February 10, 2008
Another drawing from this week

Some drawings

Monday, February 4, 2008
Canvas view of The Brook
Last Session of the First day

Third Stage

Next stage
 As I have shown you before, I usually lay in the darks first. The background will be very dark with some of the underpainting showing through. The rocks are dark, and I have concentrated on the shadow side of the rock.
 In reading some of the literature from Atelier Chroma Interactive, they suggest using some of your existing paints for the underpainting. So I used Old Holland Acrylics for this stage. The colors are Indiago, Caput Mortuum Violet (Mars), and Daniel Smith Indanthrone Blue. These are all very dark colors. I do not like to use Black at this time, as it does not have the depth of color that other colors do.
The Brook, second stage
The Making of a Painting, The Brook
 I this painting I will be starting with an underpainting of Old Holland Acrylic Naphtol-Vermillon. For this I have mixed the pigment with approximately 1/2 water to make it thinner. You may be able to see that the drawing can be seen under the paint. It does show up more in person.
This underpainting will unify the top painting and give it a glow that can not be duplicated. The scene is rather dark and I want to get the feeling of light on the water.
Slight delay
A resting period of sorts. I have started two new paintings. These are done in a different way than the last ones of the flowers.
The next post will be the start of the babbling brook from Colorado.
Monday, January 28, 2008
Several hours later

Another painting session over the weekend
Friday, January 25, 2008
Last try of the day
 I did not like to stop today with the red petunia so prominent. So decided to work on the upper right corner and the red petunia to soften it a bit so that it will take it's place.
 Tomorrow I will probably start early as I am very excited about painting the pink petunias. I now know pretty much what the shape of the petals are and the relative values. Although I still do not like the color.
I looked through my colors and found some new colors I order from New Holland. A brand of acrylics that I started using this summer and liked. I had been trying to fill out my palette when I discovered the Atelier Interactive. I did find in the rose that if I used the Titanium white with a color the paint kept many of the characteristics of the Interactive. Have not checked with the manufacturer if you can mix the brands, but so far so good.
Will post more tomorrow as I develop the pink petunias. It is so much fun.
Yet another session

Continuation of first session

Second phase
 Here I am experimenting with having the petunia the farthest away from the view as red. This is a challenge as red is usually a warm color that will jump forward in a painting and usually does best in the forground. Here the farthest flower will be red and the ones in the foreground are going to be pink.
Although at this point I am wondering why I do not do the petunias in white and pink. But that is not where I originally wanted to go, so if my original idea does not work out I can always go back.
First Session covering the background
Beginning of a petunia painting
Finished Painting
Wednesday, January 16, 2008
Still another session

Had an opportunity to paint for several hours on this painting this afternoon. I worked mostly on the flower in the upper right corner, and still more"lost in a rose", the center of the large rose. I am trying to define the shape of the petal and then to blend and model within the petal. I had to make quite a few changes to the outside of the smaller rose. Also many changes within the center of the larger rose. Sounds like same old, same old, but that is the nuts and bolts of painting. Always going over the same old ground until it is refined to one's liking. Sometimes you lose it, other times it gets better. I may have had some of both today.
I am getting anxious to apply the first layer of gel, which will bring many of the values together and make it a more cohesive painting. It will have at least three layers of gel and then a final coat of spray varnish for protection.
Tuesday, January 15, 2008
Another Session

Monday, January 14, 2008

This is the final session on Sunday. I painted several times for short periods, as I have something wrong with my heal and I stand to paint, so had to limit sessions by my pain threshold.
The changes now are getting more subtle, but I feel that the three dimensional qualities are really coming forth. Although I only worked on the center of the rose, developing the petals and the modeling, and also one large petal, the whole painting seems to be changing. It just proves that all things are relative.
The changes from here on will be even more subtle, so I do not know if I will publish after each session. But will as it changes from day to day.
Fourth Painting Session

Third Painting Session
 This time I worked mostly in the center of the rose. I felt like I was lost in a rose. It was very confusing and I must say it took a lot of time to keep track of where I was. The canvas is 24 X 30, although it feels a lot bigger. I do love these new paints. I am able to get the feel of the petals and can blead very well. They stay wet if you spray with a watercolor atomizer.
Friday, January 11, 2008
Online Information for Atelier Interactive Acrylic
This is a large painting, so must be done in various sittings. I will post another day's painting tomorrow, as I was able to work for about a half an hour today and will photographic tomorrow.
Also went to an opening today at the Venice Art Center and saw a new way to display paintings. The artist has taken one of the digital photo frames and was showing a painting slide by slide as it was painted. I think that I will try to do that with this painting when it is finished. It is amazing the things that happen to a painting on its way to a finished piece. A metamorphosis of sorts.
More tomorrow.
Wednesday, January 9, 2008
Second Day of Painting

This is the result of the second day of painting. As you can see I decided to make the bud facing downward. I was not able to cover the entire canvas, as I usually do as I ran out of light and energy. It is a rather large canvas, so just a bit more than I had time. I am also using a new acrylic paint for me Atelier Interactive Artists' Acrylic. I saw a real deal for it at ASW, got two sets of paint and a lot of brushes for around $40. It sold out quickly and I had to wait about a month for a second shipment, but so far I really like them.
The literature that came with it indicates that the paint does not dry with a skin, but works with the artists. It takes 10-15 minutes to dry. It does have to be kept re hydrated by spraying with water, if you want to blend and rework and area. I did find that it was easier to get the edges that I wanted and by spraying I could also get blending, which has been difficult with other brands of paint. I usually use Golden, but recently switched to Old Holland, as I like the consistency better, and also the skin that is formed.
I will let you know what happens on the third day of painting. Which will be wet over dry. I do know that the surface looks different than with other paints. There has been little to no color change. Which is good.
Monday, January 7, 2008
First day of painting

Saturday, December 29, 2007
Roses for a Painting
 These pictures will be used to create yet another picture for a show the end of January in Sarasota. As I proceed with the painting I will post other photos that I might use and show you were I am at each stage of the painting. This picture and the one below I took at Disney last year at the Christmas show. Our family met there for the opening show of Mickey and his gang for the lighting of the tree. Disney is one of the great places to photograph flowers as they have special gardens and gardeners. It is one of my favorite places for flowers and this year I hope to get to their annual flower show.
 I believe that I will use the composition of the yellow roses and incorporate the pink rose for the large rose. Which in the first picture is yellow and pink. At this point I see the bud staying the same colors and the yellow rose in the background probably staying yellow, but who knows
 This is a photo of a photo that I saw in the window of a gallery in Taos, NM I liked the idea of the large rose and the placement on the canvas. The quality is not good, but gives one an inspiration for another painting.


